Python is one of the most popular programming languages for learners. If you are a Linux user,
If you are not a Linux user, you might want to read my article on Dual booting Linux and Windows.
you must have at some point of time used “Vi” The short for “Vim”. It’s a very powerful text editor. Here, In this article I’ll be explaining how to make vim work like an IDE for you making your work-flow smooth.
I won’t be explaining about how to split your vim window into four and so on which do come under smooth work-flow, but this article is only vim-python specific.
As a beginner you won’t be needing much of the plug-ins into vim.I’ll be listing only the ones you’ll need initially.
So, first of all you need to have your vim version 7.4 or above. To check and update vim, you can use the following commands on the terminal emulator:
$ vim --version | less
$ sudo apt-get update
$ sudo apt-get install vim
f
So, ensuring that you have a supported vim version, we are now going to install a vim plugin which we rather call an utility. It will help us Manage our ‘runtimepath’ with ease. In practical terms, pathogen.vim makes it super easy to install plugins and runtime files in their own private directories.
Installing pathogen
$ mkdir ~/.vim/
$ mkdir ~/.vim/autoload
$ mkdir ~/.vim/bundle
$ cd ~/.vim/
$ git init
If you haven’t installed Git yet, you really want to install it. use sudo apt-get install git for that.
Also you want to install pip.
$ sudo apt-get install python-pip
So, till now we were kind of setting up the environment for installing pathogen, and other stuff.
Download the pathogen zip file from github here.
Now I’ll suppose you’ve downloaded the zip file on your desktop, unzip it, there’s a file pathogen.vim inside a folder called autoload. Copy that into ~/.vim/autoload that we created a while ago.
The purpose of the autoload directory is to automatically load the vim plugin Pathogen. But Rest of our plugins which will help us make vim a python IDE are going to the bundle directory.
Some of my favorite plugins are,
jedi-vim – autocompletion library
pep8 – helps me make sure my code is consistent
ack.vim – replacement for 99% of the uses of grep, shows result in a split window inside vim
Gundo.vim – A Vim plugin to visualize your Vim undo tree, Very helpful if you make mistakes while deleting stuffs.
To complete our environment for using vim plugins, we need to make a file .vimrc in our home directory. which vim will read each time it is called and further it will call pathogen in the autoload directory. the commands goes like this. (You have to create the .vimrc file if it does not already exists, ‘#’ are comments, not commands)
$ cd
$ touch .vimrc
#YOU CAN USE ANY EDITOR, HERE I'LL BE USING VIM ITSELF
$ vim .vimrc
#INSIDE THE .vimrc FILE YOU NEED TO PUT THESE LINES-->
execute pathogen#infect()
filetype off
filetype plugin indent on
set nocompatible
syntax on
set tabstop=2
set shiftwidth=2
set autoindent
set expandtab
set number
colorscheme darkblue
This is my .vimrc file, you might want to modify it according to your need. So, if you don’t know how to do it, you might just want to copy these lines into your .vimrc file. Your configuration should look something like this:-
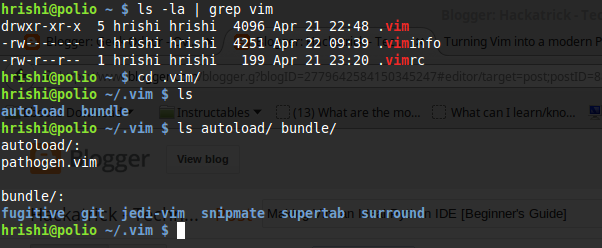
(Ignore the directories inside the bundle directory for now)
I am going to show how to install jedi-vim and surround, you can learn their usage and the installation of other plugins from their respective github pages which I’ll listing in the end of this article.
Installing Jedi-vim
$ sudo pip install jedi
$ cd ~/.vim/bundle
$ git clone https://github.com/davidhalter/jedi-vim.git
Done! You can access auto completion by using “ctrl+space”, read documentation for more info.
Now we’ll go around and install a plugin called surround,
$ cd ~/.vim
$ git submodule add https://github.com/tpope/vim-surround.git bundle/surround
Done, you have installed the surround plugin to vim, you can read it’s documentation at github for it’s usage.
Similarly, here are some more,
$ git submodule add https://github.com/tpope/vim-fugitive.git bundle/fugitive
$ git submodule add https://github.com/msanders/snipmate.vim.git bundle/snipmate
$ git submodule add https://github.com/tpope/vim-surround.git bundle/surround
$ git submodule add https://github.com/tpope/vim-git.git bundle/git
$ git submodule add https://github.com/ervandew/supertab.git bundle/supertab
$ git submodule add https://github.com/sontek/minibufexpl.vim.git bundle/minibufexpl
$ git submodule add https://github.com/wincent/Command-T.git bundle/command-t
$ git submodule add https://github.com/mitechie/pyflakes-pathogen.git
$ git submodule add https://github.com/mileszs/ack.vim.git bundle/ack
$ git submodule add https://github.com/sjl/gundo.vim.git bundle/gundo
$ git submodule add https://github.com/fs111/pydoc.vim.git bundle/pydoc
$ git submodule add https://github.com/vim-scripts/pep8.git bundle/pep8
$ git submodule add https://github.com/alfredodeza/pytest.vim.git bundle/py.test
$ git submodule add https://github.com/reinh/vim-makegreen bundle/makegreen
$ git submodule add https://github.com/vim-scripts/TaskList.vim.git bundle/tasklist
$ git submodule add https://github.com/vim-scripts/The-NERD-tree.git bundle/nerdtree
$ git submodule add https://github.com/sontek/rope-vim.git bundle/ropevim
Ref.: sontek.net and github
You are free to explore more plugins and add more into it, it’s your own little powerpacked IDE that you configured yourself using vim for python. Thanks to the open-source community. If you have more you can post them in the comments, I’ll be highly delighted to see your configuration.
